What Are ROMs And Emulators?
ROMs are video game information files. Their original purpose is to maintain backups of games that you already own. It’s considered “ethical” (and legal) to utilize ROMS for that reason only. Using game files without owning the video game is many times considered illegal.
Emulators are software programs that process ROM files. They emulate game systems. Fortunately, there’s no grey zone around using emulating programs. You can find emulators for almost any game system that’s ever been released. RetroPie installs at least 59 different game emulators by default, although only the 24-bit and lesser game systems are playable with the Raspberry Pi Zero W computing resources.
Hardware Components
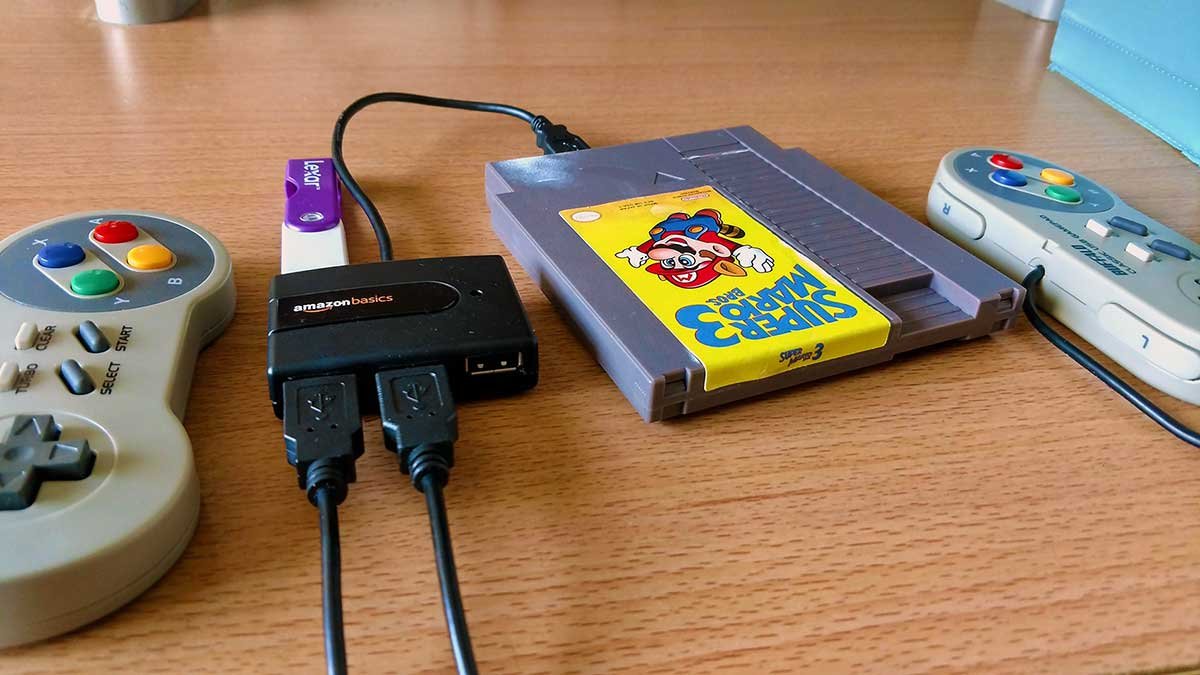
These are the hardware components required for this novelty retro gaming console project:
- Raspberry Pi Zero W board
- Mini HDMI Female-to-Male Micro USB Cable
- USB Female-to-Male Micro USB Cable
- Micro USB Female-to-Male Cable
- USB Hub (recommended: Amazon Basics)
- MicroSD Storage Card – 32GB or 64GB (recommended: 64GB)
- Empty NES Cartridge Shells
- Screwdriver bits set (if using original NES cartridge)
- Loctite Plastic Bonding superglue
- Game Sticker
- Box Cutter
- Buffalo USB SNES Controller(s)
- HDMI Adapter Cable (if you don’t have an HDMI port on your television)
- 5V 2A Micro USB Power Supply Plug
- Masking Tape, Gorilla Tape, or Foam Tape
- 16GB Empty USB Drive
Two optional components include an anti-static mat and gloves to minimize the risk of static electricity ruining your Pi board and electronic components.
Step 1: Install RetroPie Image File
Software components needed:
- 7zip (Windows)
- Win32DiskImg (Windows)
- RPi-sd card builder v1.2 (Mac OS)
RetroPie is the top-layer operating system that activates EmulationStation when you boot the device (the bottom-layer OS is a software called Raspbian). It’s the program that powers emulators and processes ROMs. This first step creates the RetroPie boot sector on the microSD drive by “flashing” it with the downloaded RetroPie image file, using a program called Win32DiskImg for Windows operating system or using a program called RPi-sd card builder v1.2 with a Mac OS. For Linux operating systems, the command “dd” can be used to flash an SD card.
First, ensure that your microSD card is formatted with the FAT/FAT 32 file system. Insert the card into your computer. If you’re using Windows, click on the drive icon and select Format or Quick Format. Choose the FAT/FAT 32 file system. If you’re using Mac OS, launch Disk Utility and then choose Erase for the microSD card. Make sure FAT is the file format. If you’re using Linux, follow the instructions for your distribution to format a storage media.
Go to https://www.retropie.org.uk and download the latest version of RetroPie (version 4.2 as of this writing). The file format should be *.img.gz. If you’re using Windows, unzip the archived file with the extension *.img using 7zip (or another preferred program of your choice). Once you have extracted the file, use any of the programs below to flash the microSD card (or use a software of your choice):
- Win32DiskImg (Windows)
- RPi-sd card builder v1.2 (Mac OS)
- dd command (Linux)
Once the process is finished, remove the card from your computer. Insert it into the storage socket on the Raspberry Pi board. Handle the storage card with anti-static gloves if you’ve decided to use them to reduce the risk of static electricity ruining the Pi board or corrupting the RetroPie MicroSD card.
Step 2: Test the Cords and Hardware
Open the NES Cartridge, Cut Out the Bottom Plastic
It’s time to open the NES cartridge. If you purchased a replica, it should have arrived unscrewed, and you only need to remove either side. For original cartridges, you will need to use the security driver set to unloosen and remove the screws, large game board, and inside wires.
The next step is to remove the bottom cover. It’s the open slot at the bottom of the cartridge. You will need to cut away both sides so that the section is accessible for the USB female ports.
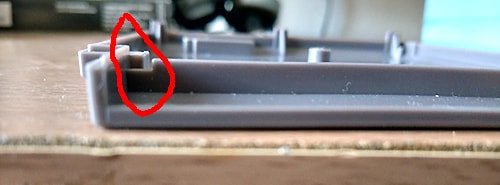
Using a box cutter, keep slashing at the bottom edge of the plastic covering until the knife punctures through it. Then keep sawing the rest of the plastic covering until the bottom is detached from the cartridge. Look for the notch that’s pictured below; saw the sides until it’s detached and then repeat on the other side.
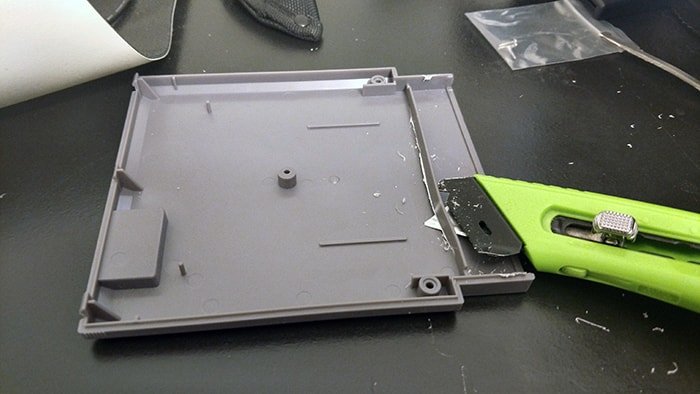
(Important note: please remember to protect or move your other hand out of the way while you’re cutting. You can seriously harm yourself. For protecting your other hand, I box-cutter-resistant gloves.)
Install the Raspberry Pi Zero W Board
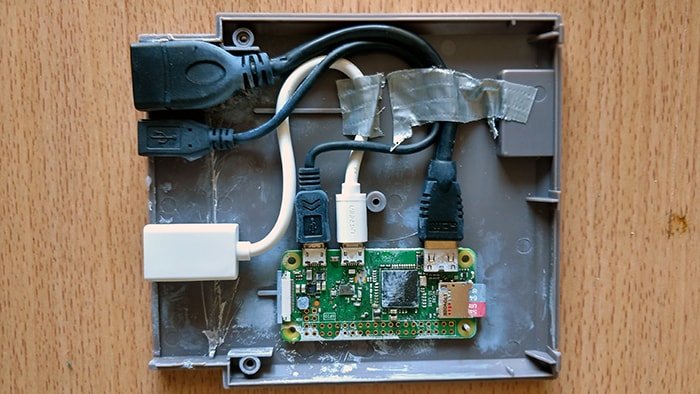
Open the NES cartridge. You will notice grey notches extending upward from the surface. They fit the corner hole punctures on the Raspberry Pi board. Install the Raspberry Pi PCB as seen in the picture below:
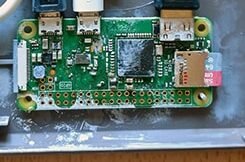
The vertical orientation is the best way of fitting all the cords in such a small and confining space.
Assemble the Cables
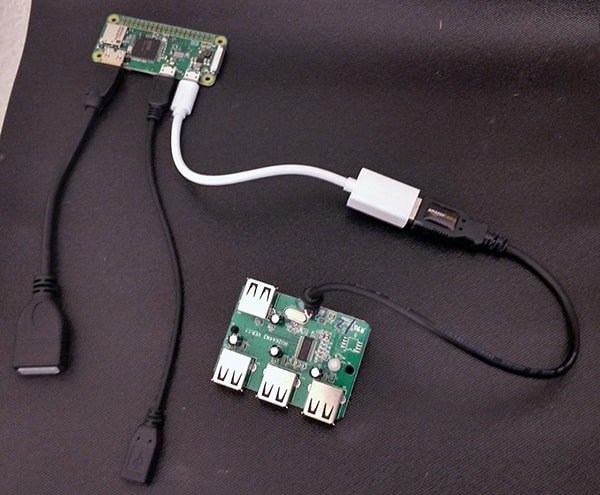
There are three peripheral micro USB ports on the Raspberry Pi Zero board. One port is for HDMI output, clearly labeled by the “HDMI” insignia. The other two ports are for power input and data input and aren’t interchangeable. Look closely at the board, and you will see the symbols “PWR” and “DATA.” Make sure that the micro USB female-to-male cord plugs into the “PWR” port, and the USB female-to-male micro USB cord plugs into the “DATA” port. Then plug the mini-HDMI micro USB converter cord into the onboard “HDMI” port.
Test the Assembly
If you have a USB hub, plug its USB cord into the USB port extending from the Pi board. Plug the power supply into the micro USB port extending from the board. This immediately powers the board and begins the boot sequence. Blinking green lights should be visible on the board if the storage card isn’t corrupt, cords connect properly in their respective ports, and the Raspberry Pi PCB functions correctly. If the USB hub contains a light, you should see it as well.

Step 3: Assemble the Console
Cut a small piece of tape (Masking Tape, Gorilla Tape, or Foam Tape) and divide it into multiple thin strips.
Leaving the cords connected to the board, place the female ends of the ports at the accessible tip of the Nintendo cartridge. Test that everything fits by placing the other half of the cartridge on top. Keep trying different arrangements until the other cartridge portion fits. You can glue the ports to the tip at this moment, but I recommend that you first use your tape strips to secure the wire arrangements. After securing the wire arrangements, straighten the ports and glue them to the NES cartridge.
——
Optional: Attach the USB Hub to the Nintendo Cartridge
(Note: this optional step only works in theory; the actual cartridge installation hasn’t been tested. Follow this step at your own risk.)
Using a screwdriver, remove the USB hub casing.
Grab a pair of pliers and remove the LED light that’s sticking up from the board. Place glue on the side of the hub’s PCB (left or right side), making certain that the glue doesn’t touch the surface or components. Insert the USB hub inside the open space at the tip of the Nintendo cartridge alongside the other glued USB ports. Push it against one of the sides and hold it there. The goal is to affix the hub to one of the open sides of the cartridges. Release it after a few minutes and let it dry for 10 minutes. Prior to enclosing the NES cartridge, squeeze the glue on top of the ports and then place the other half of the cartridge on top. Test the glue’s strength by inserting and removing USB cables. Once you glue the top of the USB hub ports, it will be nearly impossible to re-open the cartridge.
——–
Place the other half of the cartridge on top. Insert the screws. Plug in your HDMI cables, then the USB hub cable, and finally insert the Super NES controller cord into the USB hub. Plug in the power micro USB cord. Once you see the boot sequence screen, you’re done with building the console.
The next step is setting up your controllers, configuring your RetroPie console, and installing the game ROMs.
Step 4: Configure Your RetroPie Installation
Configure Your Controllers
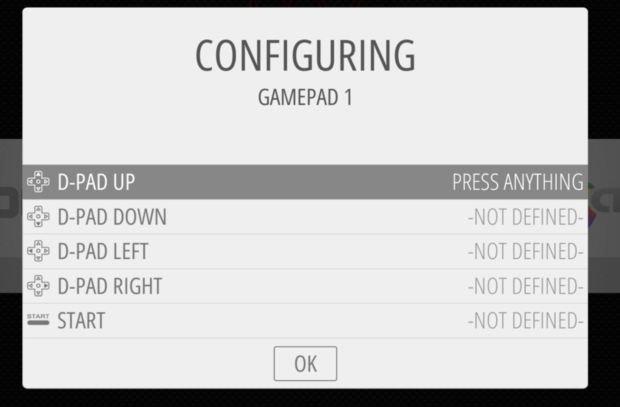
After the RetroPie and EmulationStation splash screens have been displayed, you will be required to configure your USB gamepad. Follow the easy on-screen instructions. When you are done pressing and holding down all the buttons, press the OK button.
Configure Wi-Fi Password
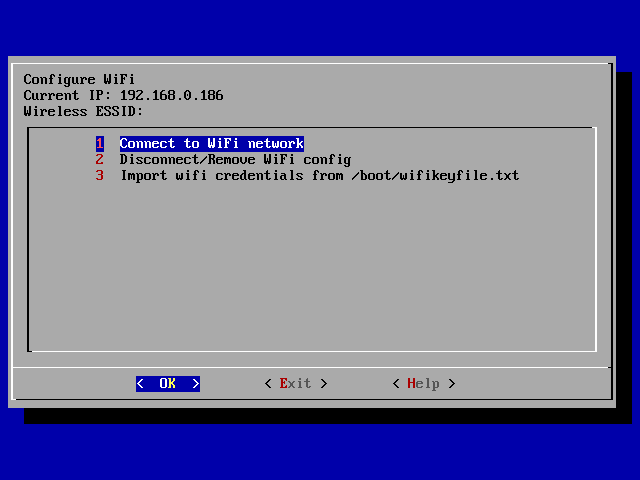
Insert the keyboard USB cable in any available USB port (including the hub). In the menu carousel, select RETROPIE. Then choose WIFI. The pop-up screen may load slowly, but afterward, you will select CONNECT TO WIFI NETWORK. Find your preferred hotspot name, enter the password, and then wait for confirmation. Exit after you see that your connection is confirmed.
Configuring the WIFI is a key step because it will give you the flexibility to transfer ROMs. The next step below describes how to add ROMs to your novelty console.
Step 5: Adding ROMs
This is the last step before you’re ready to play video games. You have three options for loading ROMs: Wireless Transfer, USB Transfer, and USB Mounting.
Wireless Transfer
Wireless is the most convenient method. For this to work, your RetroPie console and computer must be connected to the same wi-fi network. Once your RetroPie console is configured for wi-fi, you can access the microSD card by opening Windows Explorer in Windows (or open Finder, then choose Go, then select Connect to Server in Mac) and typing “\\retropie” (or “smb://retropie” in Mac) in the location bar. Proceed to the “retropie” folder, then to “roms,” and finally select the folder that corresponds to the game system of your ROM(s). Once there, transfer your ROM file(s) to that destination folder.
When you’re done, disconnect from the RetroPie and then power on the console. After the EmulationStation splash screen loads and you’re back at the game system selection, the game console of the ROM(s) should be visible and selectable.
USB Transfer
Insert your empty USB drive into your computer and create a folder called “retropie.” Then eject the drive.
After you have configured the USB gamepads, insert the USB drive into the RetroPie console (directly or via USB hub). Blinking activity will commence continually for up to a few minutes. If your USB stick doesn’t have a blinker, wait for five minutes and then remove it. Insert the USB back into your computer and access the “retropie” folder, then “roms,” and finally select the folder that corresponds to the game system of your ROM. Once there, transfer your ROM file(s) to that destination folder.
When you’re done, eject the USB drive and insert it into the RetroPie USB port (hub or direct). Blinking activity should commence again. Wait a couple of minutes after blinking has ceased, or wait five minutes and then remove the drive. Press the “Start” button, scroll to QUIT, and choose RESTART EMULATIONSTATION. After the splash screen loads and you’re back at the game system selection, the game console of the ROM(s) should be visible and selectable.
USB Mounting
The third option occupies one of the hubs but represents the best solution. USB gameplay is faster than from the microSD card. When using the USB mount option, the console utilizes the files and configurations on the USB drive instead of the onboard storage card. The main advantage is speed, but USB is also less susceptible to data corruption. The steps are similar to the USB transfer method.
Insert your empty USB drive into your computer and create a folder called “retropie-mount.” Then eject the drive.
After you have configured the USB gamepads, insert the USB drive into the RetroPie console (directly or via USB hub). Blinking activity will commence continually for up to a few minutes. If your USB stick doesn’t have a blinker, wait for five minutes and then remove it. Insert the USB back into your computer and access the “retropie-mount” folder, then “roms,” and finally select the folder that corresponds to the game system of your ROM. Once there, transfer your ROM file(s) to that destination folder.
When you’re done, eject the USB drive and insert it into the RetroPie USB port (hub or direct). Blinking activity should commence again. Wait a couple of minutes after blinking has ceased, or wait five minutes and then remove the drive. Press the “Start” button, scroll to QUIT, and choose RESTART SYSTEM. The boot sequence will re-occur. After the splash screen loads and you’re back at the game system selection, the game console of the ROM(s) should be visible and selectable.